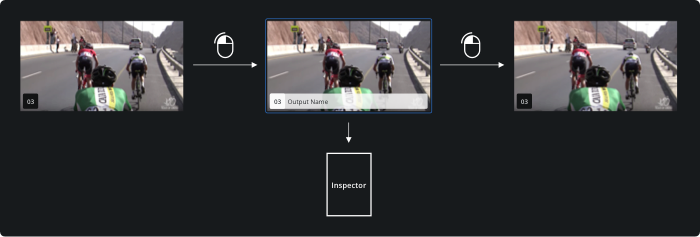
The signal/recording view provides a monitoring and control view for individual ingested signals and completed recordings/assets.
Note: The described functionality is fully available only if the respective input is assigned to a running production.
Signal and recording view
The stage provides two different modes splitting actions for the growing file/recording from the actual live signal. You can switch between modes by single-clicking on the buttons at the top of the stage.
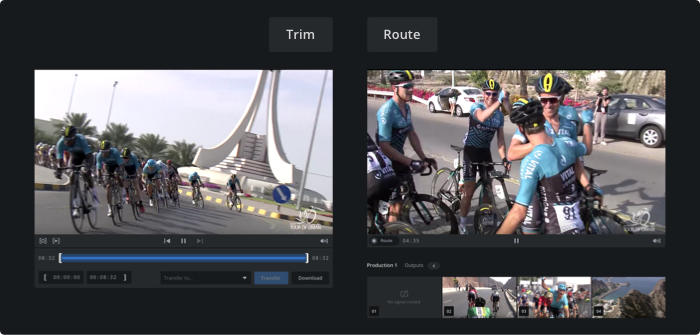
- Trim mode allows you to screen the whole timeline of an ingested stream, download content to your local machine or transmit it to a configured Transfer Target.
- In route mode, you are able to screen the current content of an ingested live signal and route the content to a running output of a production.
Upon selecting a signal, the inspector provides metrics and further information related to health and components.
Note that route mode is not available for archived completed recordings. In this case, the stage is always in Trim mode and the buttons at the top of the stage are not displayed.
Trim mode
Download entire asset or asset segment
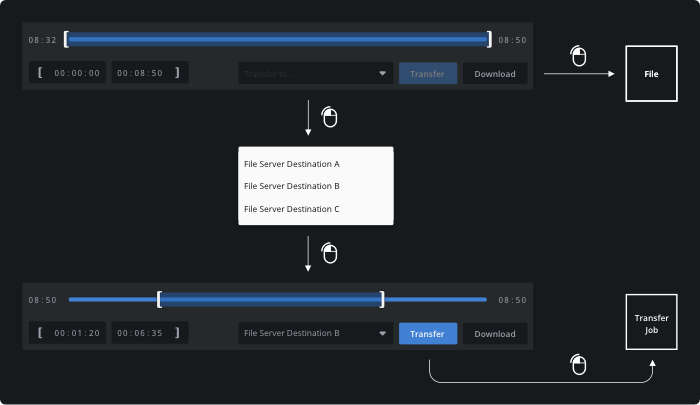
To download an asset to your local machine, single-click the download button in the bottom right corner of the player. This action downloads all of the content already recorded related to the selected signal. You can narrow the content to be downloaded by moving the trim IN/OUT points using your mouse or entering timecode values in the input fields in the bottom left corner of the player controls.
Transfer entire asset or asset segment
To transfer an asset to a Transfer Target, select the destination by opening the “Transfer to…” select box, and afterward single-click the "Transfer" button. You can narrow the content to be transferred in the same way as described above. Before you are able to use this functionality, you will need to configure a transfer target for your team.
Player controls and timeline

The player controls provide options to facilitate selecting the relevant content segment. From left to right the following functions are available in Trim mode:
- Loop – only the selected trim area is played in a loop.
- Play Trim – plays the video starting with the current trim IN point.
- Skip backward – jumps back to the beginning of the video.
- Play/Pause – plays or pauses the video.
- Skip forward – jumps forward to the current end of the video.
- Volume – allows you to mute, unmute, and control the volume of the audio.
The player timeline includes handlers for trim IN/OUT points, draggable time scrubber, and visual indicators for currently played content as well as preloaded timeline section.
Route mode
Routing a live signal
To route a live signal to an output, single-click the “Route” button in the bottom left corner of the player. You are now in the progress of establishing a new routing connection. Move your mouse over any displayed output and single-click again. The signal is now being distributed using the selected output. You can do the same vice versa, by starting with a displayed output and then connect it to the live signal's "Route" button.
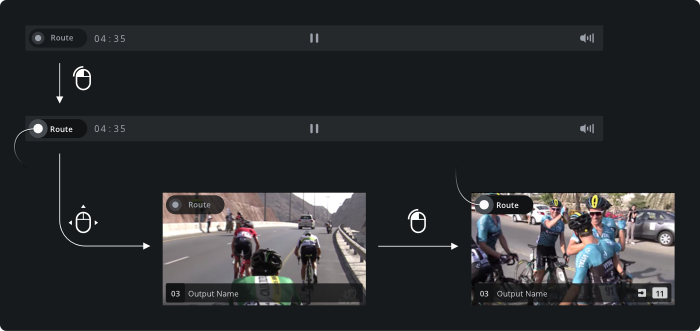
Note that only running outputs are displayed, that have a relation to the configured input via a production.
Selecting an output
Selecting an output (single-click) highlights the element and replaces the inspector content with information related to the output configuration. Outputs can be deselected by single-clicking again on the same element.