About: You can connect a Google Cloud Storage library to your LTN Schedule system to use your cloud files in the playlist. (Available since version 9.5)
Not sure how to start?
→ Learn to create and use folders in the library.
Connect Google Cloud Storage as external library
To connect a new Google Cloud Storage:
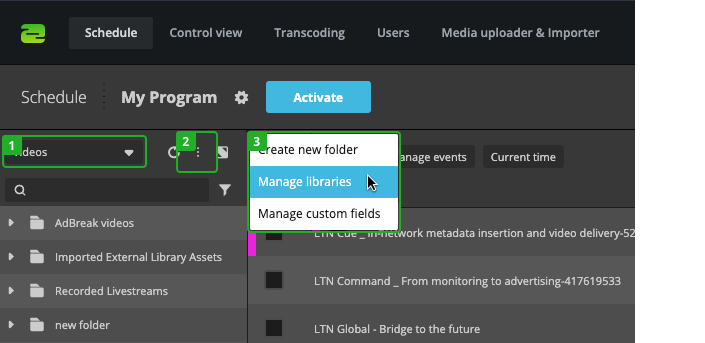
- Select Videos in the library dropdown.
- Click on More in the library.
- Select Manage libraries.
In the Manage libraries dialog:
- Click on Add in the top right corner of the dialog.
- Select Google Cloud Storage from the dropdown.
- Click Edit on the new library.
In the Modify Google Cloud Storage dialog:
- Library name: Enter the name of your Google Cloud library.
- Service account key: Enter here the JSON you download after creating a Key for your service account on Google Cloud (IAM -> Service Account)
- Bucket: If you decide to go for the manual setup, enter here the name of the bucket that Schedule should use. Otherwise, after entering the Service account key, a list of available buckets will be displayed from which you can choose the relevant one.
- Subscription ID: If you decide to go for the manual setup, enter here the ID of the subscription created that is connected to the Google Cloud Pub/Sub topic that received the notifications from the selected bucket.
Setup & Permissions
Automatic setup
For the automatic setup, you only need to provide Schedule with the key to a service account that has a certain number of permissions (see below). Schedule will then be able to fetch the buckets itself and you will be able to choose it directly in the Schedule UI. Schedule will finally create the topic, notification configuration and subscription itself and your library will directly be ready.
Automatic setup permissions
If you are setting up the external library automatically, the set of required manual permissions for the service account is the following:
- pubsub.subscriptions.consume (on the indicated subcription)
- storage.buckets.get (for the selected bucket)
- storage.buckets.list (if no selected bucket)
- storage.objects.get (on the selected bucket)
- storage.objects.list (on the selected bucket)
- pubsub.subscriptions.create
- pubsub.subscriptions.delete (cleanup)
- pubsub.topics.attachSubscription
- pubsub.topics.create
- pubsub.topics.delete (cleanup)
- pubsub.topics.detachSubscription (cleanup)
- pubsub.topics.getIamPolicy (to give access to storage agent)
- pubsub.topics.setIamPolicy (to give access to storage agent)
- resourcemanager.projects.get (to get the storage agent)
- storage.buckets.update (for the selected bucket, to set the notification configuration)
Manual setup (https://cloud.google.com/storage/docs/reporting-changes#console)
When setting up manually the library, you will have to prepare the whole setup for Schedule to synchronize correctly with your bucket. You will be able to also give less permissions to Schedule for it to work, but you will have to maintain the configuration.
In order to configure notifications for your bucket, use either one of the google CLI tools:
- With gcloud CLI:
gcloud storage buckets notifications create gs://BUCKET_NAME --topic=TOPIC_NAME
or
- With gsutil:
gsutil notification create -t TOPIC_NAME -f json gs://BUCKET_NAME
-> These commands will also create a Google Pub/Sub topic if the TOPIC_NAME doesn't already exist.
Finally, If there is no Google Pub/Sub subscription connected to the topic, create one, make sure it is a Pull subscription, this will be the Subscription ID you need to use in the Schedule configuration. If you need more information, refer to the previous link to the Google Cloud documentation
Manual permissions (manual setup)
If you are setting up the external library manually, the set of required manual permissions for the service account is the following:
- pubsub.subscriptions.consume (on the indicated subcription)
- storage.buckets.get (for the selected bucket)
- storage.buckets.list (if no selected bucket)
- storage.objects.get (on the selected bucket)
- storage.objects.list (on the selected bucket)
After you connected your new Google Cloud Storage, switch to the library to access and use your cloud files.
How to continue?